umami 实现网站流量统计模块

前言

建站之后,很难没有统计网站访问人数的想法,本篇在 hexo 框架 + anzhiyu 主题环境下,利用 umami 0 成本实现网站流量统计,并实现统计模块。顺便说一下模块开发历程吧 (真是一波三折啊)

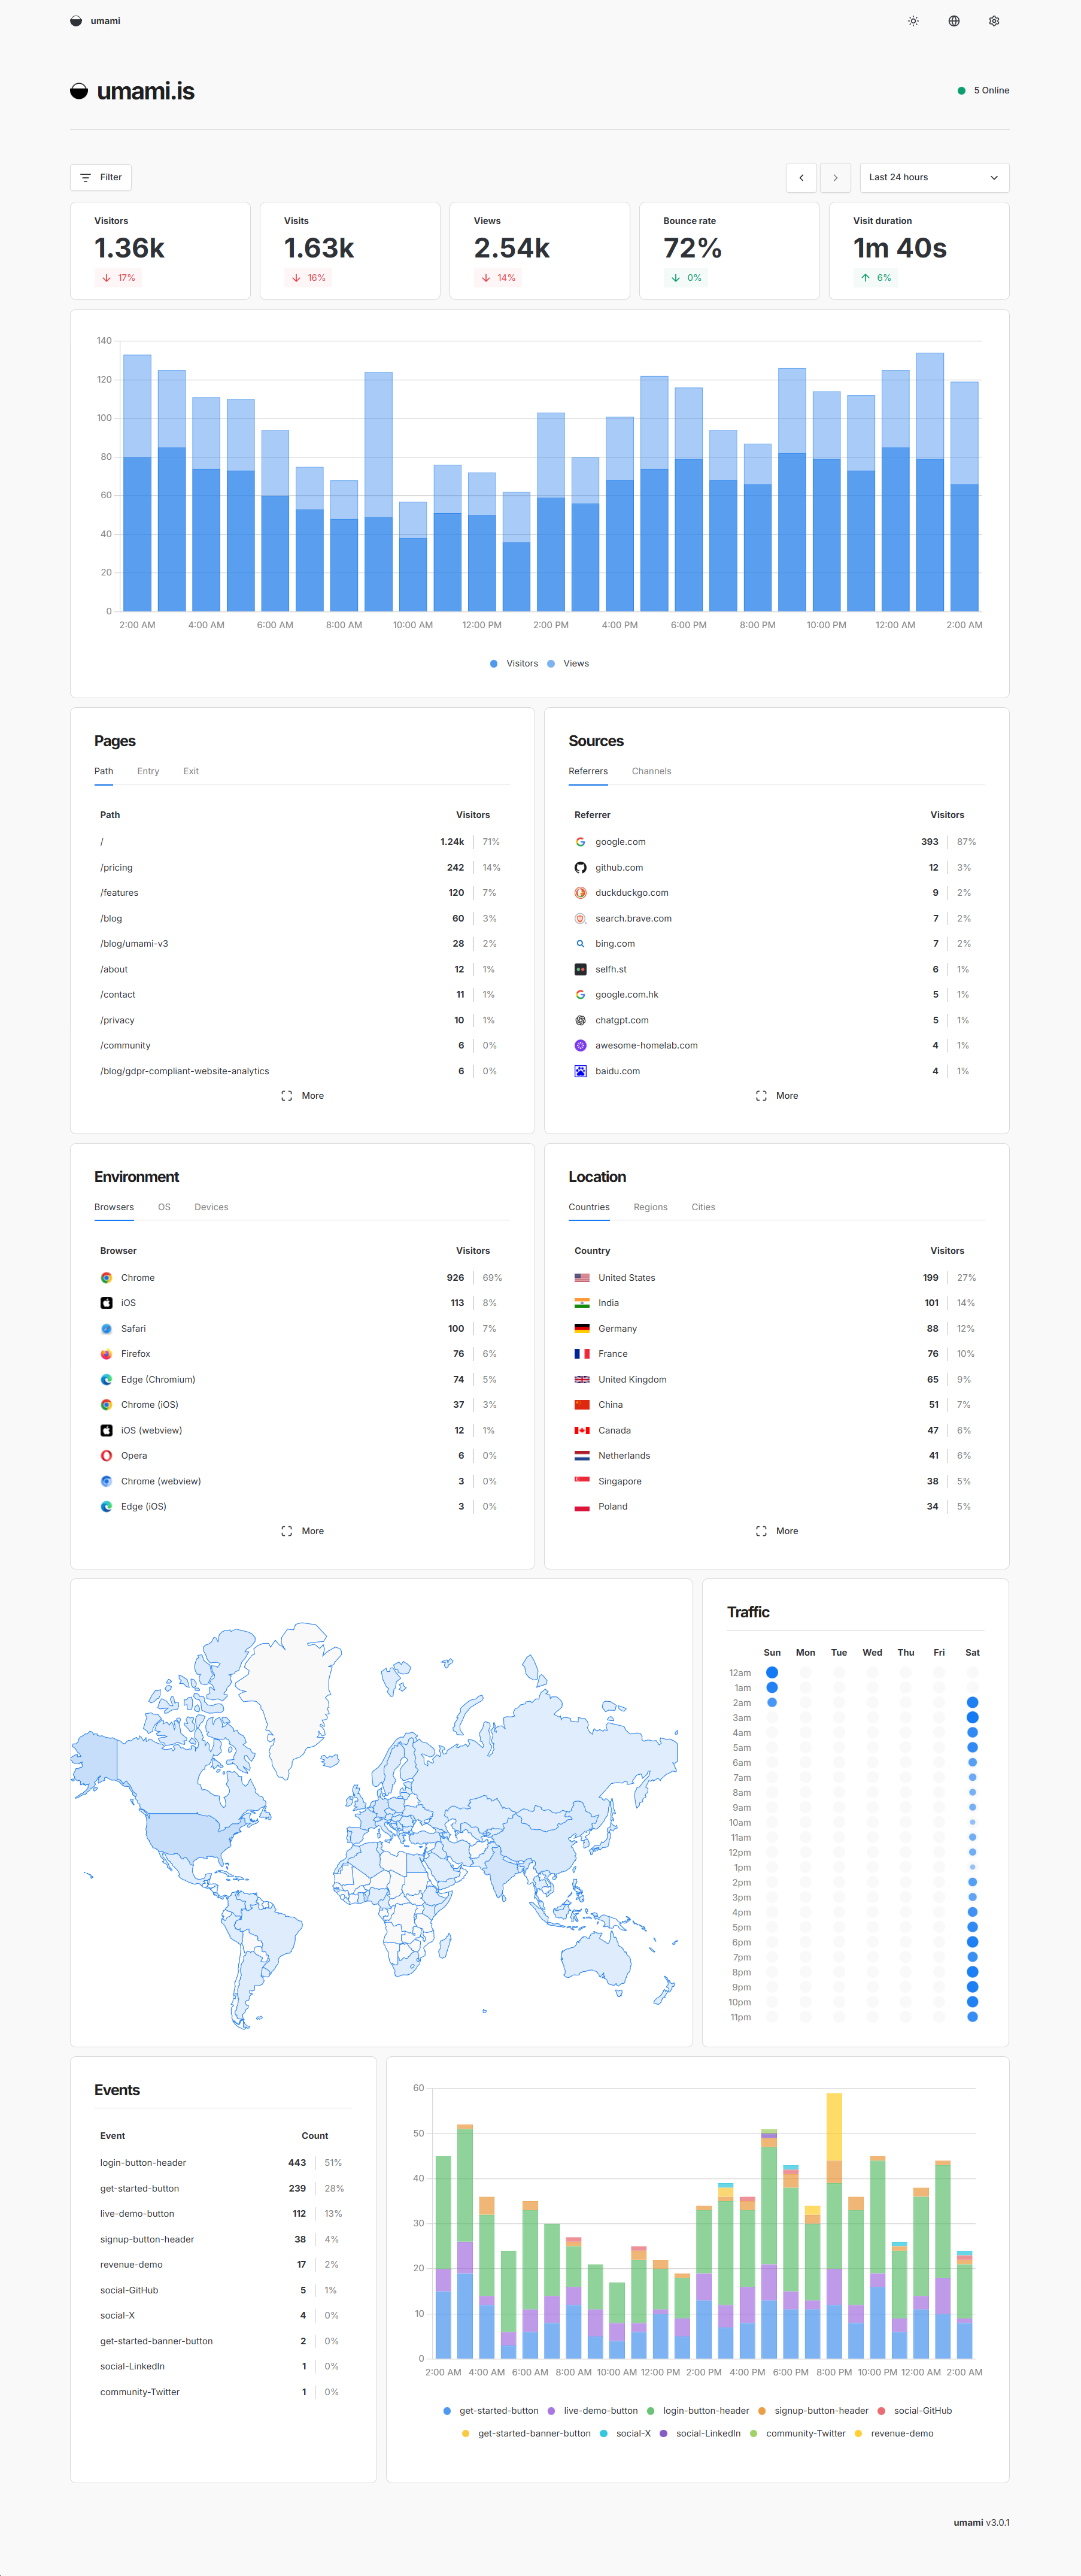
umami 统计工具感觉很 nice 啊,首先是 0 成本,然后你还能直接用它的 Umami Cloud 而不用部署自己的数据库,展示的数据也很全面,网页的 GUI 看着也是蛮舒服的

GUI 参考

写 umami 模块的过程也是挺坎坷的,遇到了很多坑。

准备工作

为了使用 umami,要先得到三样东西,website idtracking codeapi key,简单带过

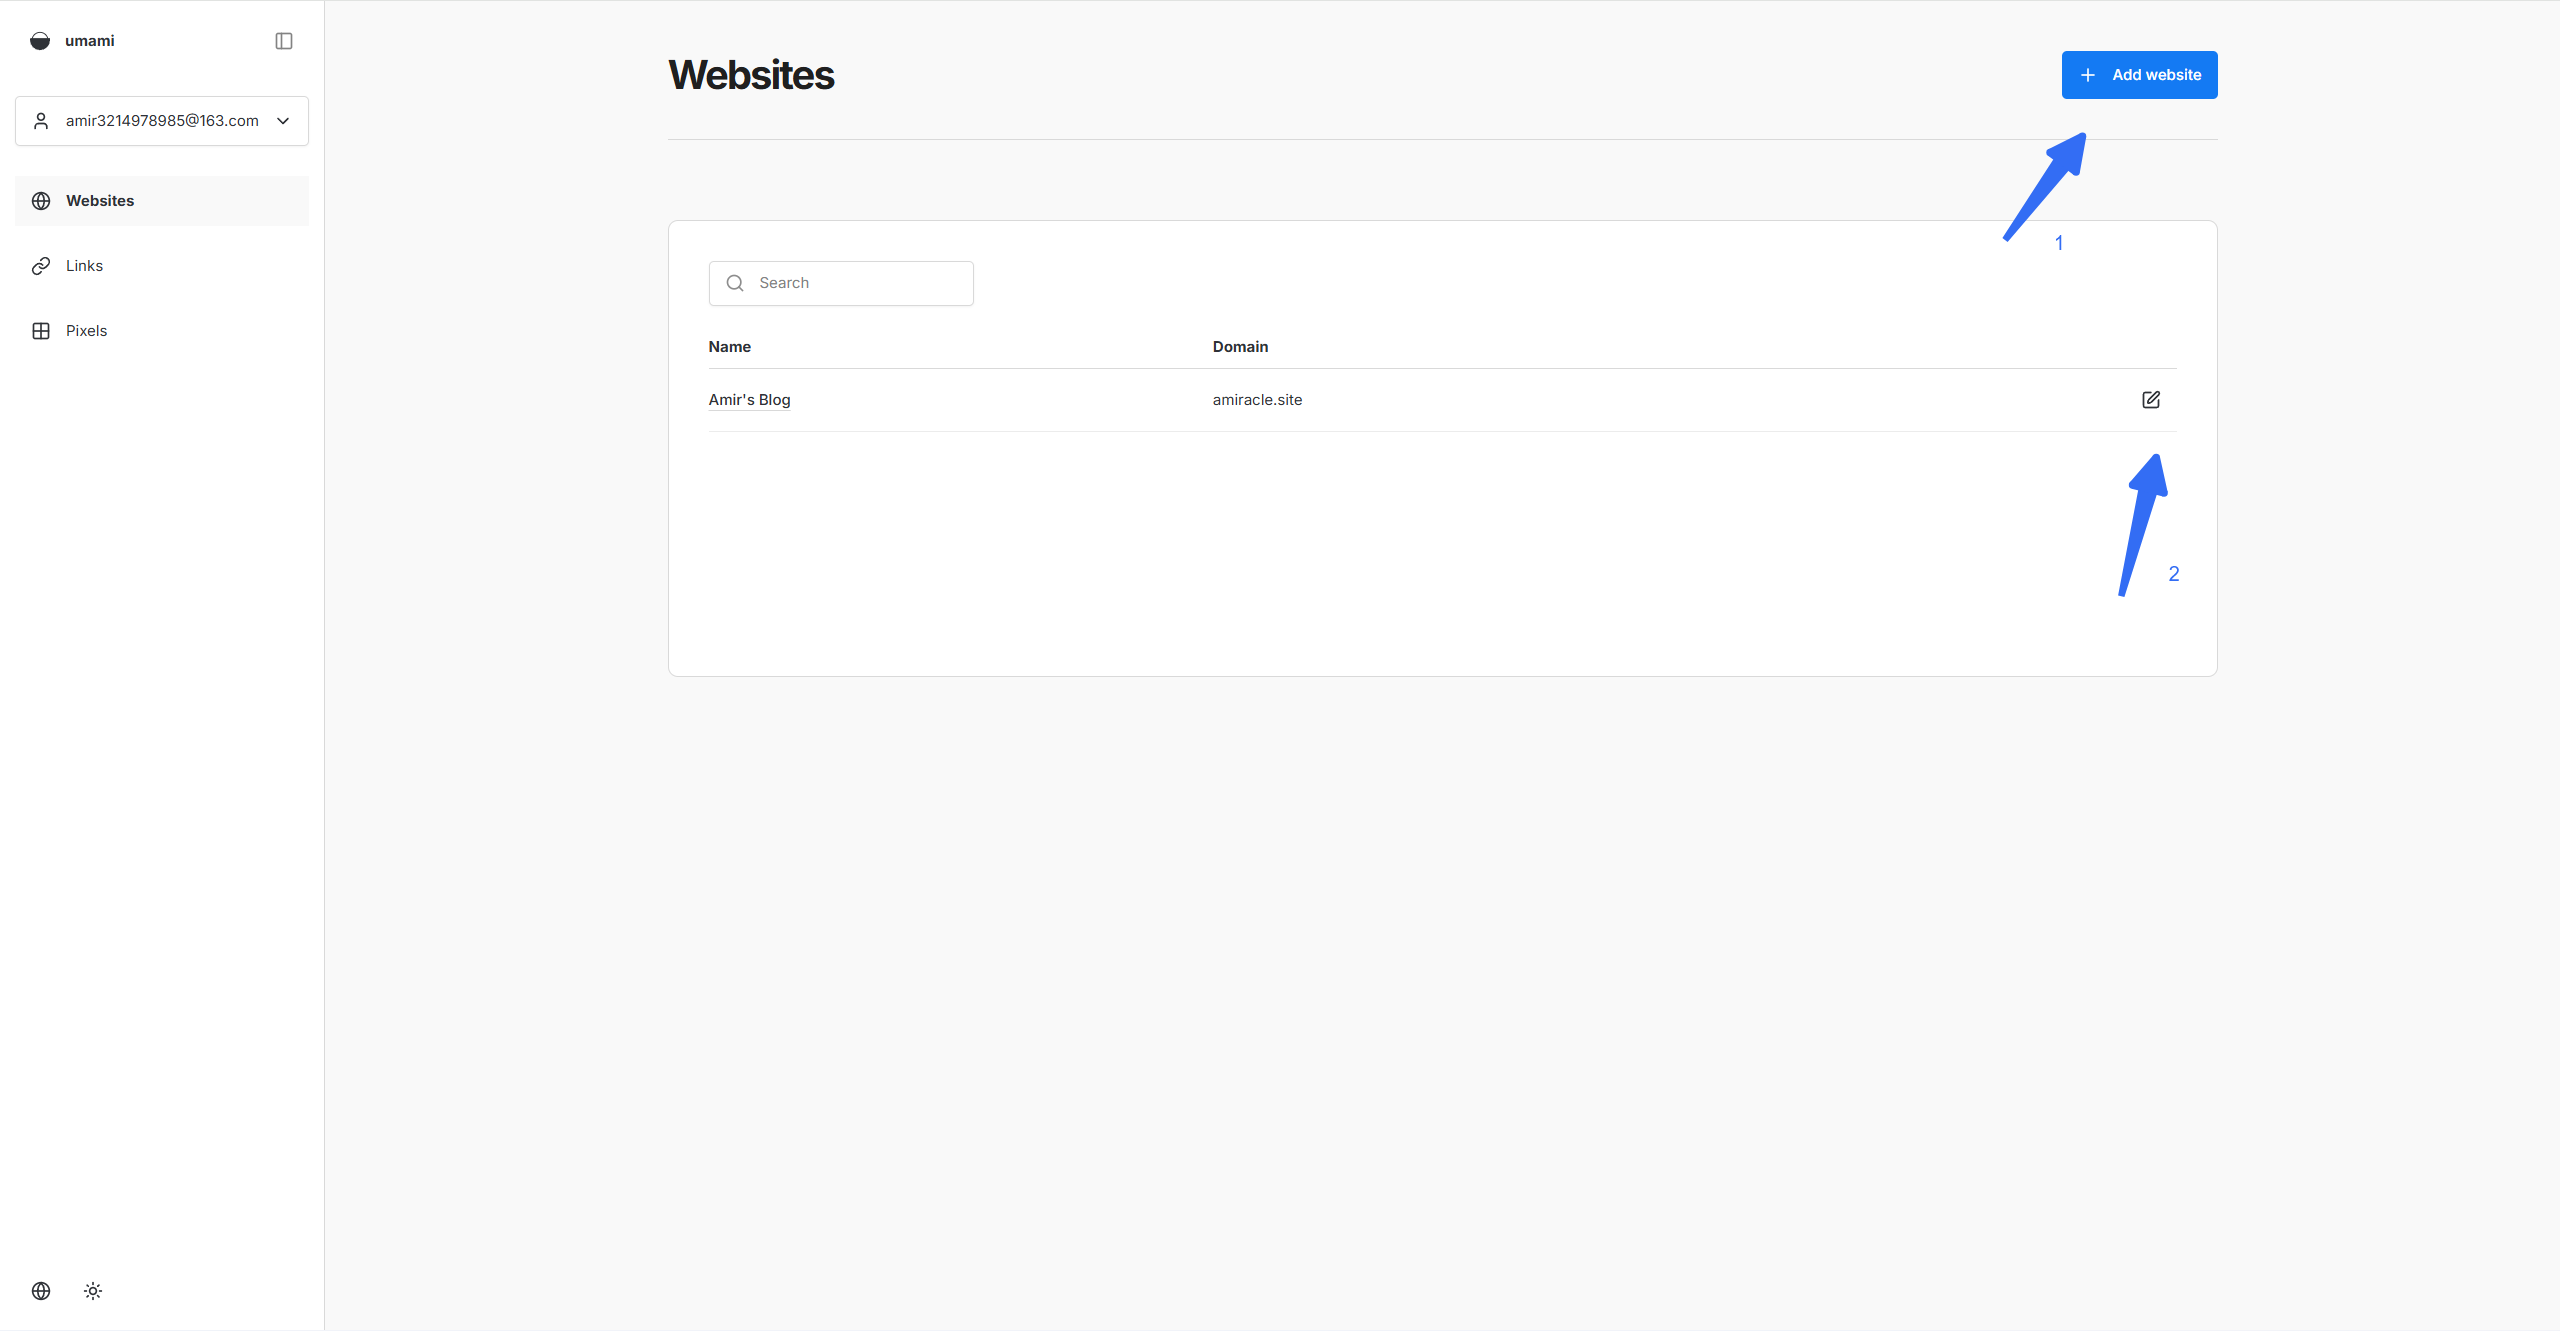
首先在 umami 官网 注册账号,之后到控制台新增网站,然后打开右侧设置页面

可以看到 Website IDTracking code

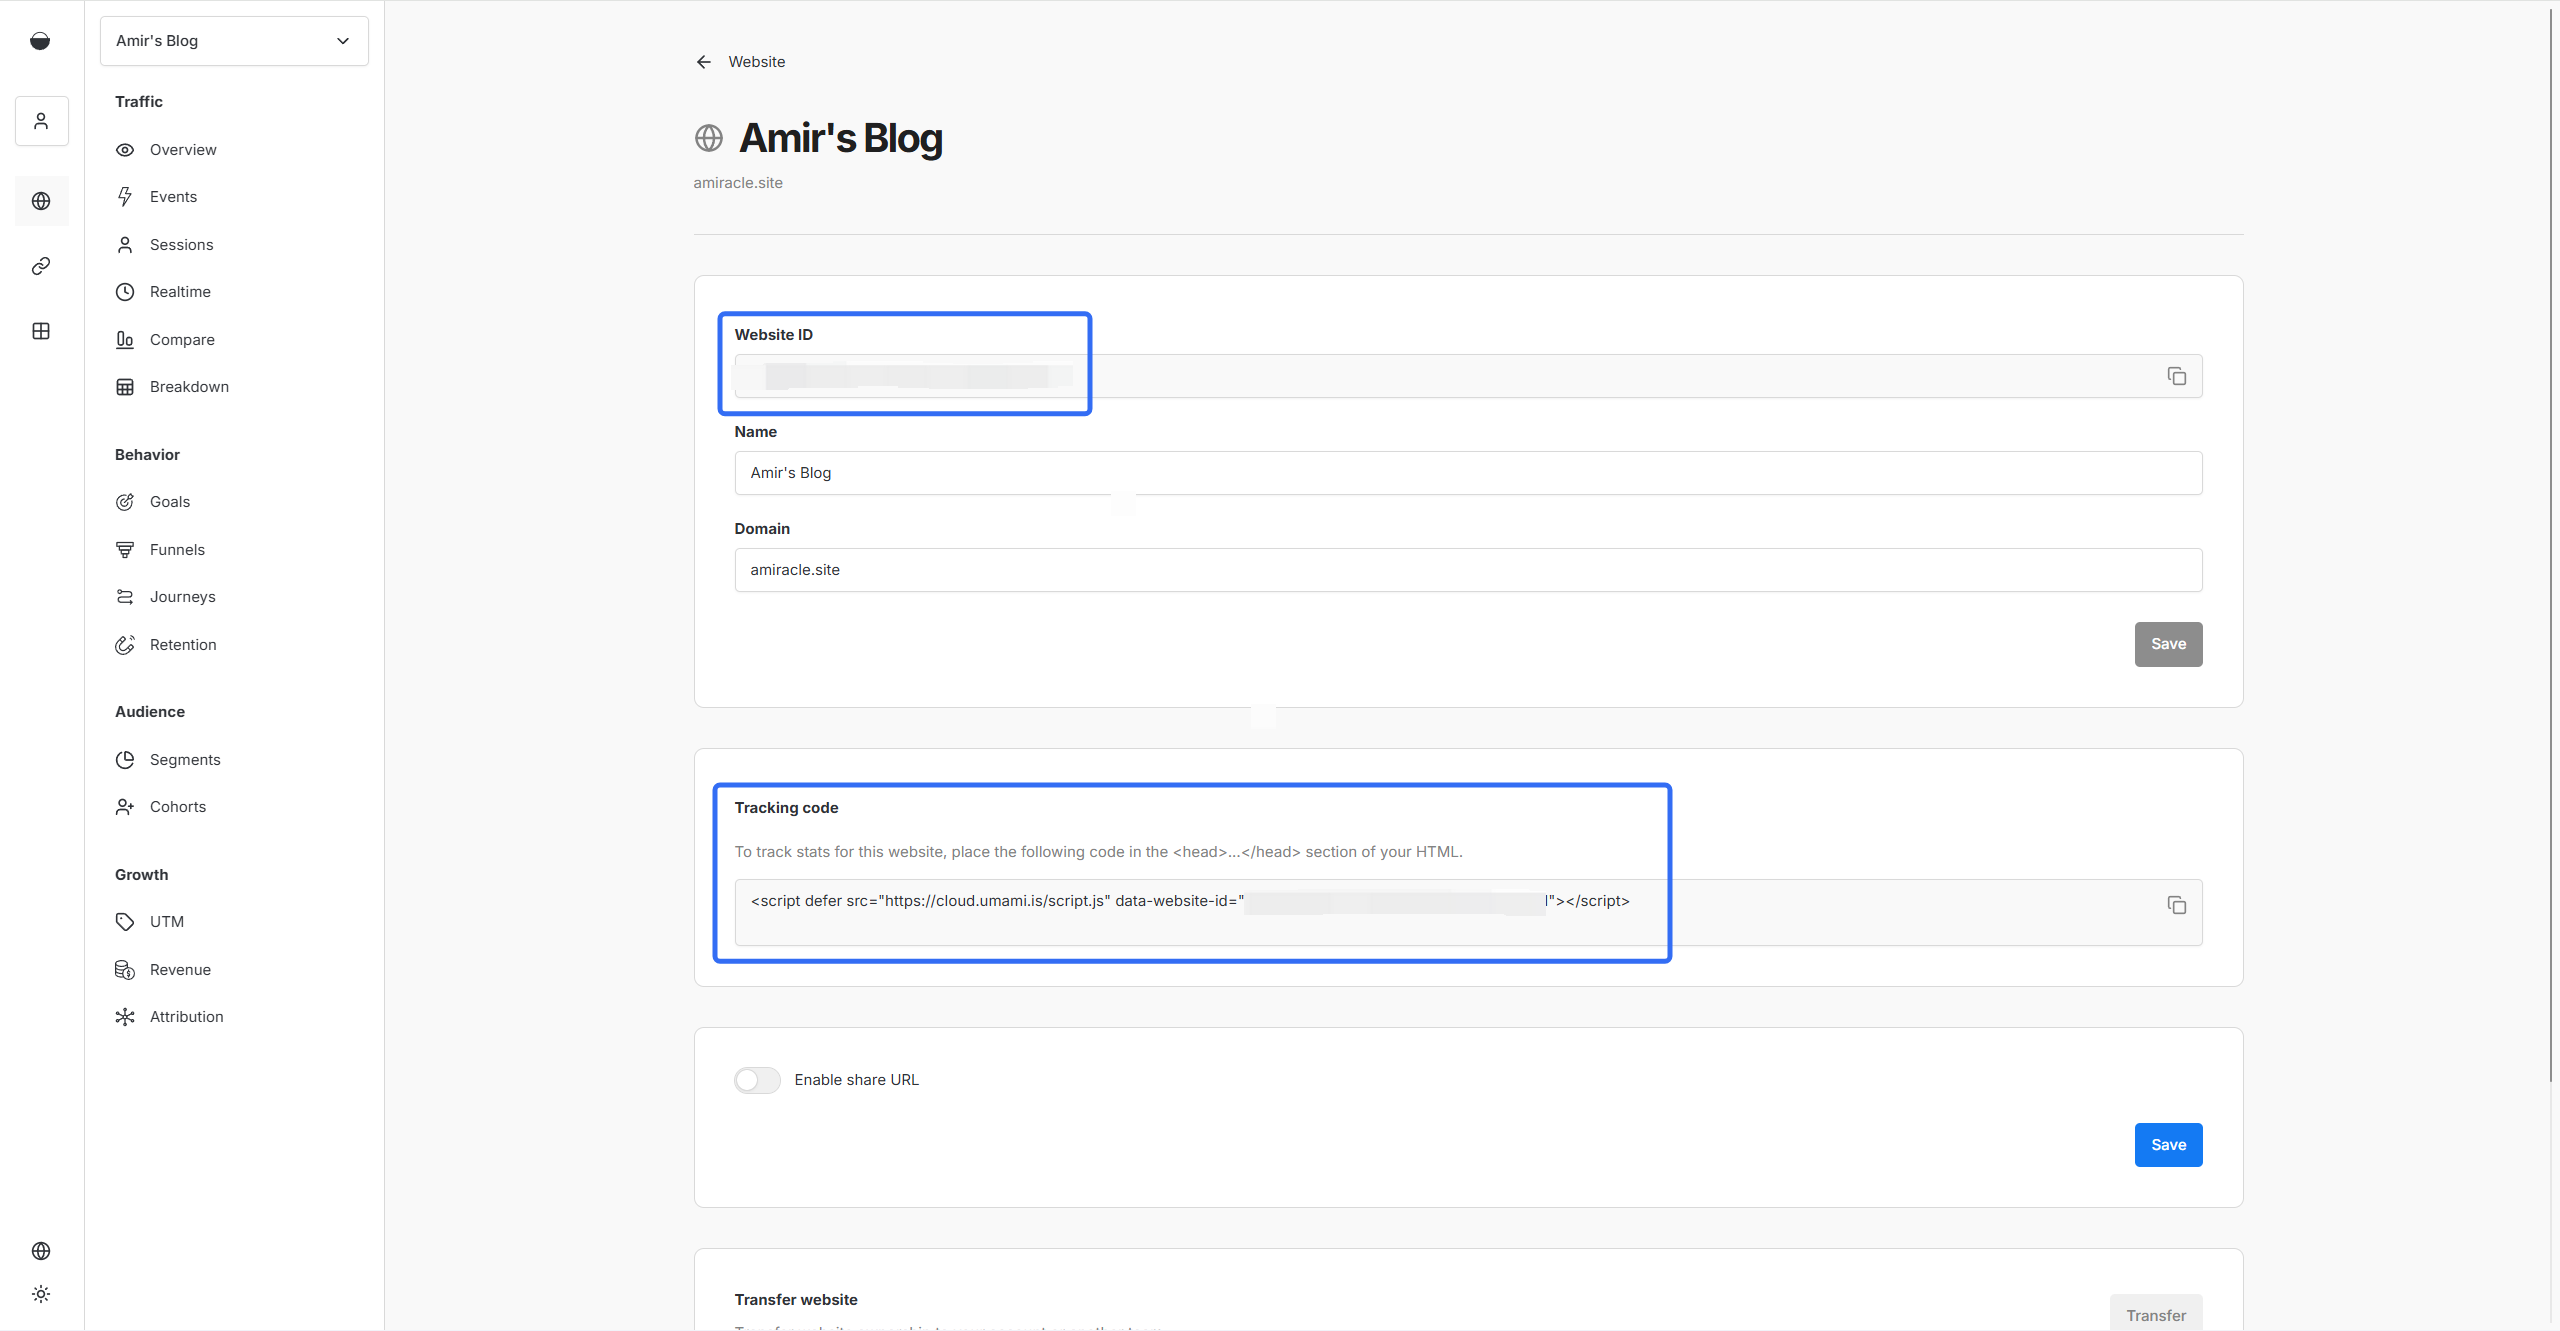
为了统计网站数据,我们需要将 <script> 代码片段插入到网页的 <head> 里面,当有人访问网站时,该脚本会自动向 umami 发送数据以进行统计。在 anzhiyu 主题,主题的 _config.yml 文件中内置了插入接口,可以直接放在 inject.head

1
2
3
4
5
6
7
8
inject:
head:
- <script defer src="https://cloud.umami.is/script.js" data-website-id="xxxx"></script>
# 自定义css
# - <link rel="stylesheet" href="/css/custom.css" media="defer" onload="this.media='all'">
bottom:
# 自定义js
# - <script src="/js/xxx"></script>

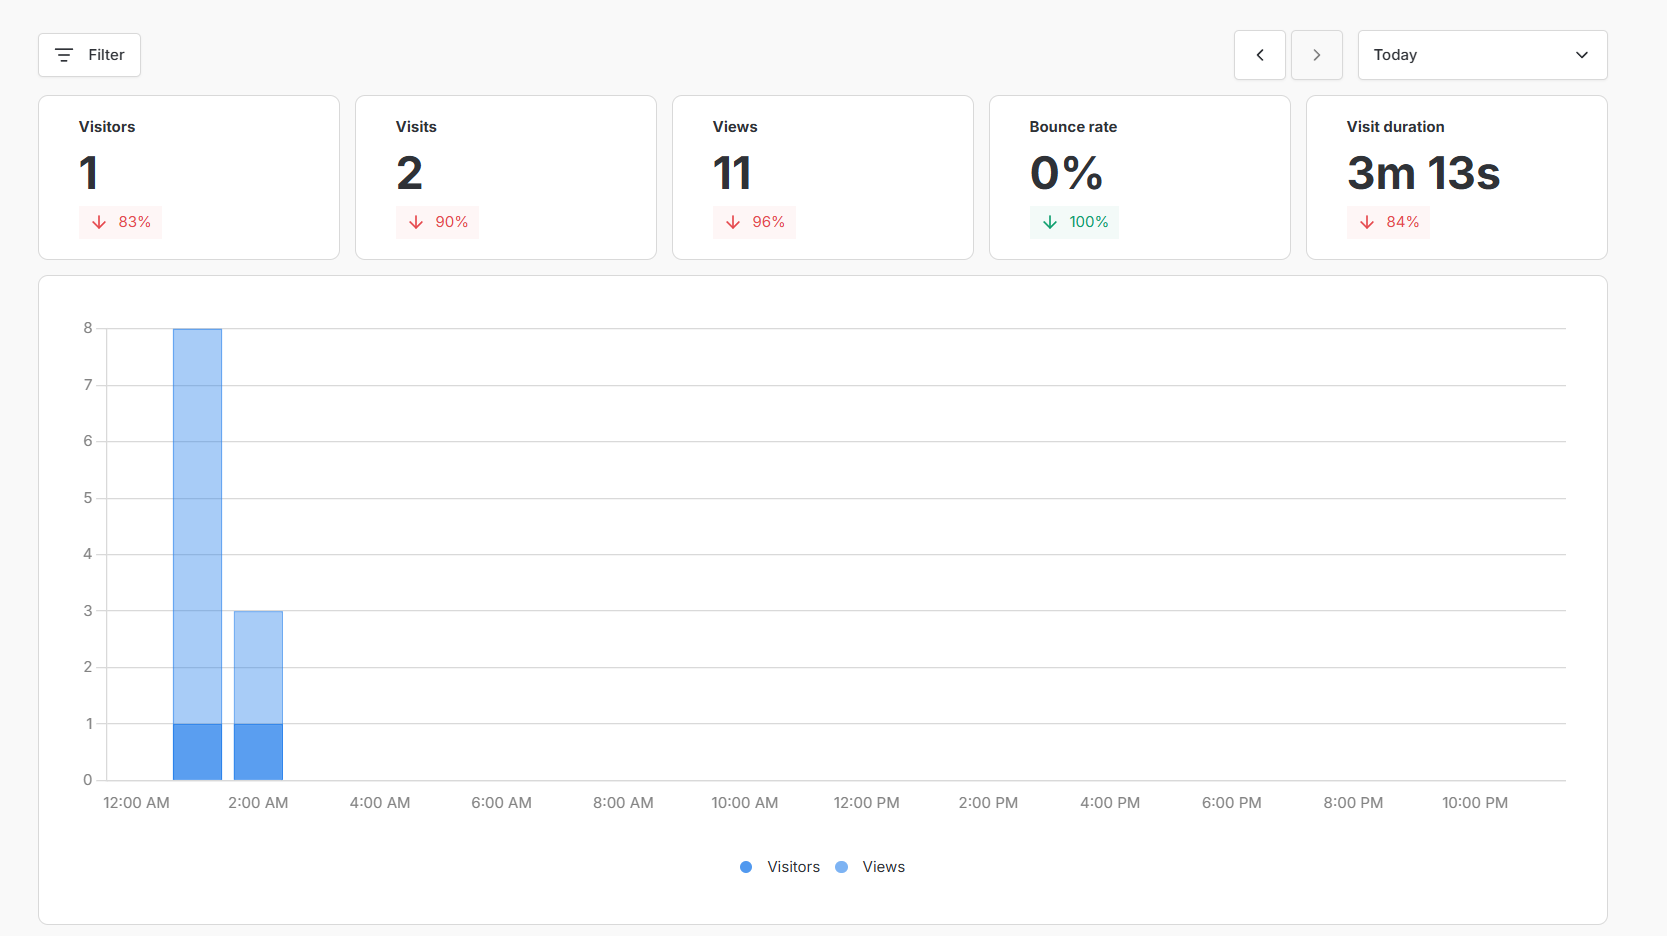
测试是否可用,文件保存后,打开网站随便刷新几下。还是相当灵敏,这是在 umami 控制台看到的访问数据
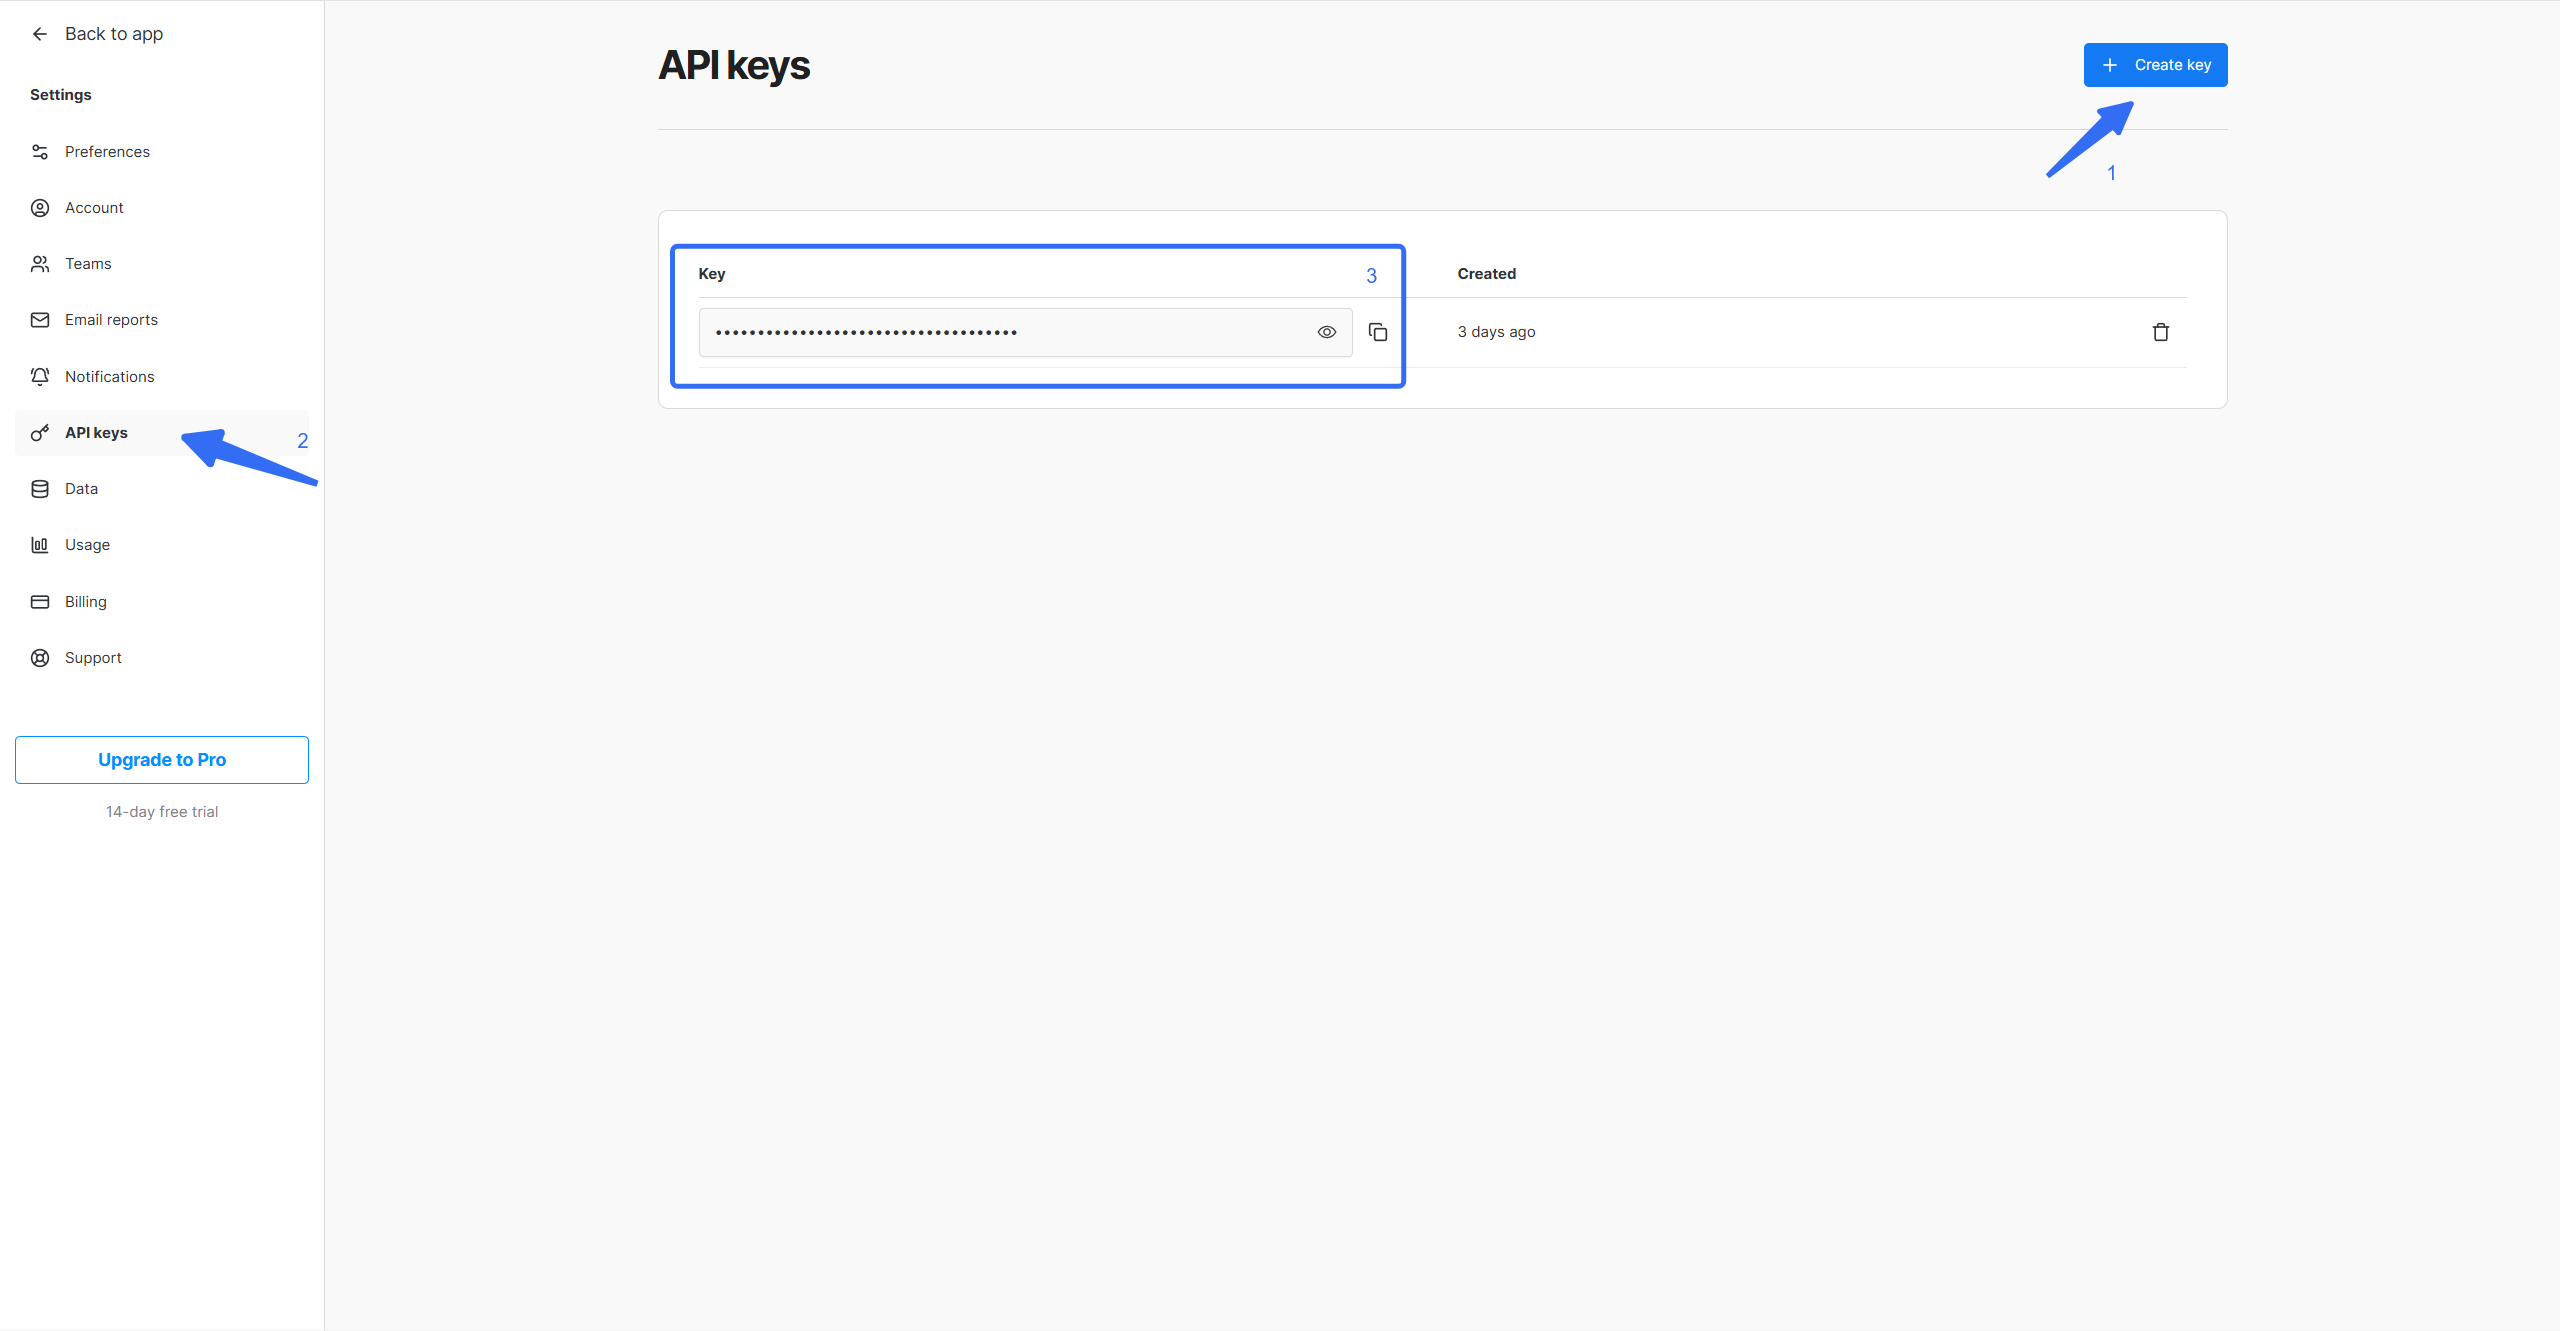
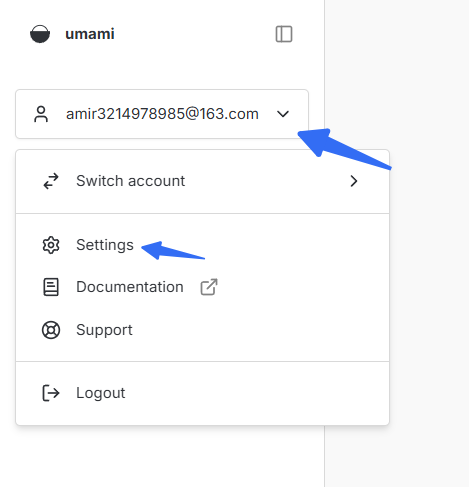
image-20251201064056428在主页左侧栏找到 Settings,然后进入 API keys 页面,新建 API 即可成功拿到 api key

上述流程非常之简单啊,于是来到了下面的关键部分

获取数据

我不止想从 umami 网页上看到数据,还想在博客展示,那肯定要先拉取统计数据。然而 GPT 说要写 js,向服务器请求数据。啊?可我只是编程菜鸡啊,没学过 js 根本看不懂呐,怎么办 QAQ,那我只能浅学恶补一下 js 了

JavaScript 基础

网页三剑客之一的 JavaScript (js),是动态,解释型编程语言,负责网页的行为/交互逻辑,同时也常用于服务器和移动端的开发

机制

事件循环(Event loop) 是 JavaScript 的核心机制,解释了单线程 JS 如何处理同步任务和异步任务。在此机制下,任务执行顺序大致是 同步任务 -> 微任务 -> 一个宏任务 -> 微任务 -> 一个宏任务 … ,注意每个宏任务执行后都会清空微任务队列且同步任务优先级最高,如此直到队列为空

主线程遇到同步任务时会立刻执行直到完成,遇到异步任务时不会等待完成,即不会被其阻塞,会把任务交给游览器或 node.js 后台等外部环境处理(比如 I/O,定时器,网络请求),然后自己去执行后续任务。异步任务完成后,其回调被加入微任务或宏任务队列等待主进程去执行,这也就是异步执行的逻辑

运行

Node.js 是执行 javascript 代码的工具,在终端使用 node 执行 js 代码

1
node file.js

发起请求

通过 fetch 可以向服务器发起请求

1
let res = await fetch("https://example.com");

GET 请求完整示例,比如 fetch octocat(据说是吉祥物) 的用户信息

1
2
3
4
5
let URL = "https://api.github.com/users/octocat";
fetch(URL)
.then(res => res.json())
.then(data => console.log(data));
console.log("主线程已走到此处")

调用 fetch 会立刻执行网络请求并返回一个 promise 对象,而且主线程并不会等待请求的完成,会将等待网络请求的任务丢给别人,之后其走到 .then() 时会注册回调,.then() 里面的东西会也会异步执行

promise 对象有三种状态 pendingfulfilledrejected,当状态变成 fulfilled/rejected 时,注册的 .then()/.catch() 回调会加入微任务队列,等待主线程执行

若能成功 fetch,会输出 JSON 格式内容,大概是

1
2
3
4
5
6
7
8
9
10
11
12
主线程已走到此处
{
login: 'octocat',
id: 583231,
url: 'https://api.github.com/users/octocat',
name: 'The Octocat',
blog: 'https://github.blog',
location: 'San Francisco',
public_repos: 8,
followers: 20890,
following: 9,
}

可以发现很合理的现象 —— 下面的语句更先执行。这正是因为主线程没有等待 fetch 执行完成,先去执行了后续任务也就是 console.log("主线程已走到此处"),当 promise 状态改变后才执行了 fetch 中的回调,输出了 json 数据

更现代化的写法是用 async funtion,在此函数中允许使用 await 来暂停函数内部的执行。具体来说,为何需要异步执行,因为服务器返回数据需要时间,为了不阻塞主进程,fetch 发起请求之后,函数的剩余部分会进入微任务队列,主线程会先去执行别的任务,等 promise 改变即服务器响应后,再执行该函数剩余部分,这样就有了更高的工作效率。

1
2
3
4
5
(async () => {
let res = await fetch(URL);
let data = await res.json();
console.log(data);
})();

res.json() 前也需要 await ,此解析操作也是异步执行,没有会导致过早的执行 console.log(data)

此外,( lambda )(); 是立即执行的匿名函数表达式(IIFE),=> 是 js 里匿名函数的写法,上述代码等价于

1
2
3
4
5
6
async function work (){
let res = await fetch(URL);
let data = await res.json();
console.log(data);
}
work()

拉取网站统计信息

详细接口可以参考 umami docs,获取相关数据我们可以使用 Endpoint : ../websites/<website_Id>/stats

umami cloud 是官方提供所有用户的存储服务,若要使用则前缀设为 https://api.umami.is/v1 即可

接着要在请求头带上 api_key,另外可以带上 startAt & endAt 参数指定时间范围,js 代码如下,stAt/edAt 为时间戳(ms)

1
2
3
4
5
6
7
8
9
10
11
12
13
14
15
16
17
18
19
20
21
22
23
24
25
26
27
28
29
30
const URL = "https://api.umami.is/v1";
const WEBSITE_ID = "xxx";
const API_KEY = "xxx";

async function getStats(stAt, edAt){
const url = `${URL}/websites/${WEBSITE_ID}/stats?startAt=${stAt}&endAt=${edAt}`;
try{
const res = await fetch(url, {
headers: {
// 说明期望数据格式是 json 格式
"Accept": "application/json",
"x-umami-api-key": API_KEY
}
});
if(!res.ok) throw new Error(`Status: ${res.status}`);
return await res.json();
}
catch(error){
console.error("获取数据出错 QAQ", error);
return {pageviews: -1, visitors: -1};
}
}

(async () => {
let tm1 = new Date();
let tm2 = new Date(); // 获取当前时间
tm1.setHours(0, 0, 0, 0); // 设 tm1 为 00:00:00
let res = await getStats(tm1.getTime(), tm2.getTime());
console.log(res);
})();

若是自建数据库,并部署了 umami 实例,为获取数据库中的数据,上述代码中 URL 改成 http://<your-umami-instance>/api 即可,从 umami 获取到的 JSON 数据参考

1
2
3
4
5
6
7
8
{
pageviews: 29,
visitors: 2,
visits: 6,
bounces: 1,
totaltime: 3674,
comparison: { pageviews: 4, visitors: 2, visits: 2, bounces: 1, totaltime: 341 }
}

一开始我理解错了文档,导致一直 fetch 不到信息,状态码 500。

官网写的是 Endpoint : GET /api/websites/:websiteId/stats,于是我就通过 Umami Cloud 的 https://api.umami.is/vifetch("https://api.umami.is/v1/api/websites/:websiteId/stats),但是根本就 fetch 不到啊,我一堆问号,问 ai 才知道,原来不应该写 /api,果然,去掉之后成功 fetch。

后来发现文档原来有 curl 的示例,然而因为 crul 不熟,所以我直接略过,导致调了半天,没仔细阅读文档导致的。

anzhiyu 统计模块

有了上述代码,我们就可以得到任意时间段的数据。我需要的是 今日人数, 今日访问, 昨日人数, 昨日访问, 本月访问, 本年访问,还要处理一下数据,代码如下

1
2
3
4
5
6
7
8
9
10
11
12
13
14
15
16
17
18
19
20
21
22
23
24
25
26
27
28
29
30
31
32
33
34
35
36
37
38
39
40
41
42
43
44
45
46
47
48
49
50
51
52
53
54
55
56
57
58
59
60
61
62
63
64
65
66
const URL = "https://api.umami.is/v1";
const WEBSITE_ID = "xxx";
const API_KEY = "xxx";

async function getStats(stAt, edAt){
const url = `${URL}/websites/${WEBSITE_ID}/stats?startAt=${stAt}&endAt=${edAt}`;
try{
const res = await fetch(url, {
headers: {
// 说明期望数据格式是 json 格式
"Accept": "application/json",
"x-umami-api-key": API_KEY
}
});
if(!res.ok) throw new Error(`Status: ${res.status}`);
return await res.json();
}
catch(error){
console.error("获取数据出错 QAQ", error);
return {pageviews: -1, visitors: -1};
}
}

async function getAll(){
// 今日, 昨日, 本月, 本年
let tday0 = new Date(), tday1 = new Date();
tday0.setHours(0, 0, 0, 0);

let yday0 = new Date(), yday1 = new Date();
yday0.setDate(tday0.getDate() - 1);
yday1.setDate(tday0.getDate() - 1);
yday0.setHours(0, 0, 0, 0);
yday1.setHours(23, 59, 59, 999)

let mo0 = new Date(), mo1 = new Date();
mo0.setDate(1);
mo0.setHours(0, 0, 0, 0);

let year0 = new Date(), year1 = new Date();
year0.setMonth(0, 1); // 1 月 1 日

// 并行处理
const [tday_res, yday_res, mo_res, year_res] = await Promise.all([
getStats(tday0.getTime(), tday1.getTime()),
getStats(yday0.getTime(), yday1.getTime()),
getStats(mo0.getTime(), mo1.getTime()),
getStats(year0.getTime(), year1.getTime())
]);

const result = {
"今日人数" : tday_res.visitors,
"今日访问" : tday_res.pageviews,
"昨日人数" : yday_res.visitors,
"昨日访问" : yday_res.pageviews,
"本月访问" : mo_res.pageviews,
"本年访问" : year_res.pageviews
};
// console.log(result);

return result;
};

(async () => {
const res = await getAll();
console.log(res);
})();

node file.js 运行,输出如下

1
2
3
4
5
6
7
8
{
'今日人数': 5,
'今日访问': 56,
'昨日人数': 4,
'昨日访问': 43,
'本月访问': 56,
'本年访问': 841
}

接着我在 themes\anzhiyu\layout\includes\page\about.pug 中找到了主题自带的 LA 统计模块,初看很晦涩,然而仔细研究一下代码,发现确实很晦涩,在 ai 的辅助下也是有点难看懂,不过没关系,只需要看懂部分关键逻辑,其他直接沿用就好,于是就有了下面的代码,主要是插入了上述代码,然后对原代码稍加修改最后加上 if/else 就大功告成了。

补充一下,pug 是一种生成 html 的模板语言,在 script(). 里引用 pug 变量 需要使用 #{},在修改 pug 文件后需要 hexo clean && hexo s 重新部署后网页才会改动。

注意 : 用户可以读到前端代码,因而 API_KEY 之类的东西不能直接明文写在前端比如 pug 里,应该定义在后端,在前端引用。

( 严格来说其实下面是 pug 代码,因为 highlight 不支持 pug,我搞了半天也没搞懂怎么弄,只能暂用 js 标签了 TAT )

1
2
3
4
5
6
7
8
9
10
11
12
13
14
15
16
17
18
19
20
21
22
23
24
25
26
27
28
29
30
31
32
33
34
35
36
37
38
39
40
41
42
43
44
45
46
47
48
49
50
51
52
53
54
55
56
57
58
59
60
61
62
63
64
65
66
67
68
69
70
71
72
73
74
75
76
77
78
79
80
81
82
83
84
85
86
87
88
89
90
91
92
93
94
95
96
97
98
99
100
101
102
103
104
105
106
107
108
109
110
111
112
113
114
115
116
117
118
119
120
121
122
123
124
125
126
127
128
129
130
131
132
133
134
135
136
137
138
139
140
141
142
143
144
145
146
147
148
149
150
151
152
153
154
155
156
157
158
159
160
161
162
163
164
165
166
167
168
169
170
171
172
173
174
175
176
177
178
179
180
181
182
183
184
185
186
187
188
189
190
191
192
193
194
195
196
197
198
199
200
201
202
203
204
205
206
207
208
209
210
211
212
213
214
215
216
217
218
219
220
221
222
223
224
225
226
227
228
229
230
231
232
233
234
235
236
237
238
239
240
241
242
243
244
245
246
247
248
249
250
251
252
253
254
255
256
257
258
259
260
261
262
263
264
265
266
267
268
269
270
271
272
273
274
275
276
277
278
279
.author-content
if theme.LA.enable || theme.umami.enable // +
- let cover = item.statistic.cover
.about-statistic.author-content-item(style=`background: url(${cover}) top / cover no-repeat;`)
.card-content
.author-content-item-tips 数据
span.author-content-item-title 访问统计
#statistic
.post-tips
| 统计信息来自
// ++
if(theme.umami.enable)
a(href='https://cloud.umami.is/analytics/us/websites', target='_blank', rel='noopener nofollow') umami 统计工具
else if(theme.LA.enable)
a(href='https://invite.51.la/1NzKqTeb?target=V6', target='_blank', rel='noopener nofollow') 51la 网站统计
// ++
.banner-button-group
- let link = item.statistic.link
- let text = item.statistic.text
a.banner-button(onclick=`pjax.loadUrl("${link}")`)
i.anzhiyufont.anzhiyu-icon-arrow-circle-right
|
span.banner-button-text=text

// ... 无关代码省略 ... //

script(defer).
function initAboutPage() {
// LA 部分
if(#{theme.LA.enable}){
fetch("https://v6-widget.51.la/v6/#{ck}/quote.js")
.then(res => res.text())
.then(data => {
let title = ["最近活跃", "今日人数", "今日访问", "昨日人数", "昨日访问", "本月访问", "总访问量"];
let num = data.match(/(<\/span><span>).*?(\/span><\/p>)/g);

num = num.map(el => {
let val = el.replace(/(<\/span><span>)/g, "");
let str = val.replace(/(<\/span><\/p>)/g, "");
return str;
});

let statisticEl = document.getElementById("statistic");

// 自定义不显示哪个或者显示哪个,如下为不显示 最近活跃访客 和 总访问量
let statistic = [];
for (let i = 0; i < num.length; i++) {
if (!statisticEl) return;
if (i == 0) continue;
statisticEl.innerHTML +=
"<div><span>" + title[i] + "</span><span id=" + title[i] + ">" + num[i] + "</span></div>";
queueMicrotask(() => {
statistic.push(
new CountUp(title[i], 0, num[i], 0, 2, {
useEasing: true,
useGrouping: true,
separator: ",",
decimal: ".",
prefix: "",
suffix: "",
})
);
});
}

let statisticElement = document.querySelector(".about-statistic.author-content-item");
function statisticUP() {
if (!statisticElement) return;

const callback = (entries, observer) => {
entries.forEach(entry => {
if (entry.isIntersecting) {
for (let i = 0; i < num.length; i++) {
if (i == 0) continue;
queueMicrotask(() => {
statistic[i - 1].start();
});
}
observer.disconnect(); // 停止观察元素,因为不再需要触发此回调
}
});
};

const options = {
root: null,
rootMargin: "0px",
threshold: 0
};
const observer = new IntersectionObserver(callback, options);
observer.observe(statisticElement);
}

const selfInfoContentYear = new CountUp("selfInfo-content-year", 0, #{selfInfoContentYear}, 0, 2, {
useEasing: true,
useGrouping: false,
separator: ",",
decimal: ".",
prefix: "",
suffix: "",
});

let selfInfoContentYearElement = document.querySelector(".author-content-item.selfInfo.single");
function selfInfoContentYearUp() {
if (!selfInfoContentYearElement) return;

const callback = (entries, observer) => {
entries.forEach(entry => {
if (entry.isIntersecting) {
selfInfoContentYear.start();
observer.disconnect(); // 停止观察元素,因为不再需要触发此回调
}
});
};

const options = {
root: null,
rootMargin: "0px",
threshold: 0
};
const observer = new IntersectionObserver(callback, options);
observer.observe(selfInfoContentYearElement);
}

selfInfoContentYearUp();
statisticUP()
});
}
// 新增的 umami 部分
else if (#{theme.umami.enable}){
(async () => {
const URL = "#{theme.umami.api_url}";
const WEBSITE_ID = "#{theme.umami.website_id}";
const API_KEY = "#{theme.umami.api_key}";

let statistic = [];
async function getStats(stAt, edAt){
const url = `${URL}/websites/${WEBSITE_ID}/stats?startAt=${stAt}&endAt=${edAt}`;
try{
const res = await fetch(url, {
headers: {
// 说明期望数据格式是 json 格式
"Accept": "application/json",
"x-umami-api-key": API_KEY
}
});
if(!res.ok) throw new Error(`Status: ${res.status}`);
return await res.json();
}
catch(error){
console.error("获取数据出错 QAQ", error);
return {pageviews: -1, visitors: -1};
}
}
async function getAll(){
// 今日, 昨日, 本月, 本年
let tday0 = new Date(), tday1 = new Date();
tday0.setHours(0, 0, 0, 0);

let yday0 = new Date(), yday1 = new Date();
yday0.setDate(tday0.getDate() - 1);
yday1.setDate(tday0.getDate() - 1);
yday0.setHours(0, 0, 0, 0);
yday1.setHours(23, 59, 59, 999)

let mo0 = new Date(), mo1 = new Date();
mo0.setDate(1);
mo0.setHours(0, 0, 0, 0);

let year0 = new Date(), year1 = new Date();
year0.setMonth(0, 1); // 1 月 1 日

// 并行处理
const [tday_res, yday_res, mo_res, year_res] = await Promise.all([
getStats(tday0.getTime(), tday1.getTime()),
getStats(yday0.getTime(), yday1.getTime()),
getStats(mo0.getTime(), mo1.getTime()),
getStats(year0.getTime(), year1.getTime())
]);

const result = {
"今日人数" : tday_res.visitors,
"今日访问" : tday_res.pageviews,
"昨日人数" : yday_res.visitors,
"昨日访问" : yday_res.pageviews,
"本月访问" : mo_res.pageviews,
"本年访问" : year_res.pageviews
};
// console.log(result);

return result;
};

//- let result = {
//- "A" : 1,
//- "B" : 2,
//- "C" : 3,
//- "D" : 4
//- };

let result = await getAll();
let statisticEl = document.getElementById("statistic");
for(const [key, value] of Object.entries(result)){
statisticEl.innerHTML +=
"<div><span>" + key + "</span><span id=" + key + ">" + value + "</span></div>";
queueMicrotask(() => {
statistic.push(
new CountUp(key, 0, value, 0, 2, {
useEasing: true,
useGrouping: true,
separator: ",",
decimal: ".",
prefix: "",
suffix: "",
})
);
});
}

let statisticElement = document.querySelector(".about-statistic.author-content-item");
function statisticUP() {
if (!statisticElement) return;

const callback = (entries, observer) => {
entries.forEach(entry => {
if (entry.isIntersecting) {
for (let i = 0; i < statistic.length; i++) {
queueMicrotask(() => {
statistic[i].start();
});
}
observer.disconnect(); // 停止观察元素,因为不再需要触发此回调
}
});
};

const options = {
root: null,
rootMargin: "0px",
threshold: 0
};
const observer = new IntersectionObserver(callback, options);
observer.observe(statisticElement);
}

const selfInfoContentYear = new CountUp("selfInfo-content-year", 0, #{selfInfoContentYear}, 0, 2, {
useEasing: true,
useGrouping: false,
separator: ",",
decimal: ".",
prefix: "",
suffix: "",
});

let selfInfoContentYearElement = document.querySelector(".author-content-item.selfInfo.single");
function selfInfoContentYearUp() {
if (!selfInfoContentYearElement) return;

const callback = (entries, observer) => {
entries.forEach(entry => {
if (entry.isIntersecting) {
selfInfoContentYear.start();
observer.disconnect(); // 停止观察元素,因为不再需要触发此回调
}
});
};

const options = {
root: null,
rootMargin: "0px",
threshold: 0
};
const observer = new IntersectionObserver(callback, options);
observer.observe(selfInfoContentYearElement);
}
selfInfoContentYearUp();
statisticUP()
})();
}
// ... 无关代码省略 ...

现在这个模块就差不多完工了,我们还需要在 themes\anzhiyu\_config.yml 中添加相应字段来启用

1
2
3
4
5
6
7
8
9
10
11
12
13
# 51a统计配置
LA:
enable: false
ck:
LingQueMonitorID:

# 新增的 umami 统计配置
umami:
enable: true # 是否启用 Umami 统计
# 若用 umami cloud 则为 "https://api.umami.is/v1",自建数据库则为 "http://<your-umami-instance>/api"
api_url: "https://api.umami.is/v1"
website_id: "xxx"
api_key: "xxx"

最后还需要借用 anzhiyu 佬的 LA 统计模块的前端,我最终在 themes\anzhiyu\source\css\_page\about.styl 找到了当 LA.enabletrue 时会调用的前端代码,加上三行即可

1
2
3
4
5
6
7
8
9
10
11
12
13
14
15
16
17
18
19
20
21
22
23
24
25
26
27
28
if (hexo-config('LA.enable')) {
body: 1;
}
// ++
else if (hexo-config('umami.enable')) {
body: 1;
}
// ++
else {
#about-page {
.author-content-item-group.column.mapAndInfo {
width: 100%;
}

.author-content-item-group.column {
flex-direction: row;
}

.author-content-item.map {
width: 50%;
}

.author-content-item.selfInfo {
height: 100%;
width: 49%;
}
}
}

终于! 到这里就完工了,hexo clean && hexo s 重新部署就可以,效果图如下

注意 : Umami Cloud 数据存储时限大概为 6 个月,有需求可以自行部署数据库

写在最后

插曲

about.pug 时被 vsc 坑了,它竟然没标出语法错误,我没意识到直到肉眼观察到一个极其离谱的语法错误。调试这些错误,也是直接将我 about 页的 pv 干到了 500 多。要四了,愿天堂有能显示 pug 语法错误的 vsc


还遇到了一个非常诡异的情况,服务器端网站竟然和本地网站显示不一样?我无可奈何,hexo clean && hexo g 后重新上传也是不行。想到可能是代码写史了,没办法只能新建一个 TEMPblog 文件夹,然后重装一遍 HEXO&ANZHIYU 了,不过轻车熟路啊,几分钟就搞好了,重新 new page about 后发现,开启 LA 统计模块咋也有相同问题,百思不得解。

实在没办法了,只能去问万能的群 u 了,没想到啊没想到,群 u 直接把问题秒了

大概就是这样,好玄学啊,我从控制台没看到网页有缓存任何数据啊,不理解,不过群 u 真是见多识广%%%

于是不知道搞了多少小时 umami 统计模块终于完工了,最后实现的效果还是很好的🎉

参考资料